DeepSeek 多模態(tài)模型 Janus-Pro 本地部署和硬件建議
當(dāng)前位置:點晴教程→知識管理交流
→『 技術(shù)文檔交流 』
一、概述Janus-Pro是DeepSeek最新開源的多模態(tài)模型,是一種新穎的自回歸框架,統(tǒng)一了多模態(tài)理解和生成。通過將視覺編碼解耦為獨立的路徑,同時仍然使用單一的、統(tǒng)一的變壓器架構(gòu)進(jìn)行處理,該框架解決了先前方法的局限性。這種解耦不僅緩解了視覺編碼器在理解和生成中的角色沖突,還增強(qiáng)了框架的靈活性。Janus-Pro 超過了以前的統(tǒng)一模型,并且匹配或超過了特定任務(wù)模型的性能。 代碼鏈接:https://github.com/deepseek-ai/Janus 模型鏈接:https://modelscope.cn/collections/Janus-Pro-0f5e48f6b96047 體驗頁面:https://modelscope.cn/studios/AI-ModelScope/Janus-Pro-7B
二、虛擬環(huán)境環(huán)境說明本文使用WSL2運行的ubuntu系統(tǒng)來進(jìn)行演示,參考鏈接:https://www.cnblogs.com/xiao987334176/p/18864140 創(chuàng)建虛擬環(huán)境conda create --name vll-Janus-Pro-7B python=3.12.7
激活虛擬環(huán)境,執(zhí)行命令: conda activate vll-Janus-Pro-7B
查看CUDA版本,執(zhí)行命令: # nvcc -V nvcc: NVIDIA (R) Cuda compiler driver Copyright (c) 2005-2025 NVIDIA Corporation Built on Wed_Jan_15_19:20:09_PST_2025 Cuda compilation tools, release 12.8, V12.8.61 Build cuda_12.8.r12.8/compiler.35404655_0 三、安裝Janus-Pro硬件要求顯存至少8G以上,推薦16G 內(nèi)存,至少16G以上,推薦32G CPU,最低4核,推薦8核 硬盤,最好50G,推薦500G
以上條件,我已經(jīng)滿足了 顯卡,RTX 5080,顯存16G 內(nèi)存,64G,DDR5 cpu,24核32線程 硬盤,2TB固態(tài)硬盤 安裝創(chuàng)建項目目錄 mkdir vllm cd vllm
克隆代碼 git clone https://github.com/deepseek-ai/Janus
安裝依賴包,注意:這里要手動安裝pytorch,指定版本。 pip3 install torch torchvision torchaudio --index-url https://download.pytorch.org/whl/cu128 安裝其他依賴組件 pip3 install transformers attrdict einops timm
下載模型 可以用modelscope下載,安裝modelscope,命令如下: pip install modelscope modelscope download --model deepseek-ai/Janus-Pro-7B 效果如下: # modelscope download --model deepseek-ai/Janus-Pro-7B Downloading Model from https://www.modelscope.cn to directory: /root/.cache/modelscope/hub/models/deepseek-ai/Janus-Pro-7B Downloading [config.json]: 100%|███████████████████████████████████████████████████| 1.42k/1.42k [00:00<00:00, 5.29kB/s] Downloading [configuration.json]: 100%|████████████████████████████████████████████████| 68.0/68.0 [00:00<00:00, 221B/s] Downloading [README.md]: 100%|█████████████████████████████████████████████████████| 2.49k/2.49k [00:00<00:00, 7.20kB/s] Downloading [processor_config.json]: 100%|███████████████████████████████████████████████| 210/210 [00:00<00:00, 590B/s] Downloading [janus_pro_teaser1.png]: 100%|██████████████████████████████████████████| 95.7k/95.7k [00:00<00:00, 267kB/s] Downloading [preprocessor_config.json]: 100%|████████████████████████████████████████████| 346/346 [00:00<00:00, 867B/s] Downloading [janus_pro_teaser2.png]: 100%|███████████████████████████████████████████| 518k/518k [00:00<00:00, 1.18MB/s] Downloading [special_tokens_map.json]: 100%|███████████████████████████████████████████| 344/344 [00:00<00:00, 1.50kB/s] Downloading [tokenizer_config.json]: 100%|███████████████████████████████████████████████| 285/285 [00:00<00:00, 926B/s] Downloading [pytorch_model.bin]: 0%|▏ | 16.0M/3.89G [00:00<03:55, 17.7MB/s] Downloading [tokenizer.json]: 100%|████████████████████████████████████████████████| 4.50M/4.50M [00:00<00:00, 6.55MB/s] Processing 11 items: 91%|█████████████████████████████████████████████████████▋ | 10.0/11.0 [00:19<00:00, 14.1it/s] 可以看到下載目錄為/root/.cache/modelscope/hub/models/deepseek-ai/Janus-Pro-7B
把下載的模型移動到vllm目錄里面 mv /root/.cache/modelscope/hub/models/deepseek-ai /home/xiao/vllm
四、測試圖片理解vllm目錄有2個文件夾,結(jié)構(gòu)如下: # ll total 20 drwxr-xr-x 4 root root 4096 May 8 18:59 ./ drwxr-x--- 5 xiao xiao 4096 May 8 14:50 ../ drwxr-xr-x 8 root root 4096 May 8 18:59 Janus/ drwxr-xr-x 4 root root 4096 May 8 16:01 deepseek-ai/
進(jìn)入deepseek-ai目錄,會看到一個文件夾Janus-Pro-7B 這個就是我們下載的大模型文件,等會會需要python代碼來調(diào)用 # ll total 16 drwxr-xr-x 4 root root 4096 May 8 16:01 ./ drwxr-xr-x 4 root root 4096 May 8 18:59 ../ drwxr-xr-x 2 root root 4096 May 7 18:32 Janus-Pro-7B/
返回上一級,在Janus目錄,創(chuàng)建image_understanding.py文件,代碼如下: import torch from transformers import AutoModelForCausalLM
from janus.models import MultiModalityCausalLM, VLChatProcessor
from janus.utils.io import load_pil_images
model_path = "../deepseek-ai/Janus-Pro-7B"
image='aa.jpeg'
question='請說明一下這張圖片'
vl_chat_processor: VLChatProcessor = VLChatProcessor.from_pretrained(model_path)
tokenizer = vl_chat_processor.tokenizer
vl_gpt: MultiModalityCausalLM = AutoModelForCausalLM.from_pretrained(
model_path, trust_remote_code=True
)
vl_gpt = vl_gpt.to(torch.bfloat16).cuda().eval()
conversation = [
{
"role": "<|User|>",
"content": f"<image_placeholder>\n{question}",
"images": [image],
},
{"role": "<|Assistant|>", "content": ""},
]
# load images and prepare for inputs
pil_images = load_pil_images(conversation)
prepare_inputs = vl_chat_processor(
conversations=conversation, images=pil_images, force_batchify=True
).to(vl_gpt.device)
# # run image encoder to get the image embeddings
inputs_embeds = vl_gpt.prepare_inputs_embeds(**prepare_inputs)
# # run the model to get the response
outputs = vl_gpt.language_model.generate(
inputs_embeds=inputs_embeds,
attention_mask=prepare_inputs.attention_mask,
pad_token_id=tokenizer.eos_token_id,
bos_token_id=tokenizer.bos_token_id,
eos_token_id=tokenizer.eos_token_id,
max_new_tokens=512,
do_sample=False,
use_cache=True,
)
answer = tokenizer.decode(outputs[0].cpu().tolist(), skip_special_tokens=True)
print(f"{prepare_inputs['sft_format'][0]}", answer)注意:根據(jù)實際情況,修改 model_path,image這2個參數(shù)即可,其他的不需要改動。
下載一張圖片,地址:https://pics6.baidu.com/feed/09fa513d269759ee74c8d049640fcc1b6f22df9e.jpeg
將此圖片,重命名為aa.jpeg,存放在Janus目錄
最終Janus目錄,文件如下: # ll total 2976
drwxr-xr-x 8 root root 4096 May 8 18:59 ./
drwxr-xr-x 4 root root 4096 May 8 18:59 ../
drwxr-xr-x 8 root root 4096 May 7 18:11 .git/
-rw-r--r-- 1 root root 115 May 7 18:11 .gitattributes
-rw-r--r-- 1 root root 7301 May 7 18:11 .gitignore
-rw-r--r-- 1 root root 1065 May 7 18:11 LICENSE-CODE
-rw-r--r-- 1 root root 13718 May 7 18:11 LICENSE-MODEL
-rw-r--r-- 1 root root 3069 May 7 18:11 Makefile
-rwxr-xr-x 1 root root 26781 May 7 18:11 README.md*
-rw-r--r-- 1 root root 62816 May 8 14:59 aa.jpeg
drwxr-xr-x 2 root root 4096 May 7 18:11 demo/
drwxr-xr-x 2 root root 4096 May 8 17:19 generated_samples/
-rw-r--r-- 1 root root 4515 May 7 18:11 generation_inference.py
-rw-r--r-- 1 xiao xiao 4066 May 8 18:50 image_generation.py
-rw-r--r-- 1 root root 1594 May 8 18:58 image_understanding.py
drwxr-xr-x 2 root root 4096 May 7 18:11 images/
-rw-r--r-- 1 root root 2642 May 7 18:11 inference.py
-rw-r--r-- 1 root root 5188 May 7 18:11 interactivechat.py
drwxr-xr-x 6 root root 4096 May 7 19:01 janus/
drwxr-xr-x 2 root root 4096 May 7 18:11 janus.egg-info/
-rw-r--r-- 1 root root 2846268 May 7 18:11 janus_pro_tech_report.pdf
-rw-r--r-- 1 root root 1111 May 7 18:11 pyproject.toml
-rw-r--r-- 1 root root 278 May 7 18:11 requirements.txt
運行代碼,效果如下: # python image_understanding.py Python version is above 3.10, patching the collections module. /root/anaconda3/envs/vll-Janus-Pro-7B/lib/python3.12/site-packages/transformers/models/auto/image_processing_auto.py:604: FutureWarning: The image_processor_class argument is deprecated and will be removed in v4.42. Please use `slow_image_processor_class`, or `fast_image_processor_class` instead warnings.warn( Using a slow image processor as `use_fast` is unset and a slow processor was saved with this model. `use_fast=True` will be the default behavior in v4.52, even if the model was saved with a slow processor. This will result in minor differences in outputs. You'll still be able to use a slow processor with `use_fast=False`. You are using the default legacy behaviour of the <class 'transformers.models.llama.tokenization_llama_fast.LlamaTokenizerFast'>. This is expected, and simply means that the `legacy` (previous) behavior will be used so nothing changes for you. If you want to use the new behaviour, set `legacy=False`. This should only be set if you understand what it means, and thoroughly read the reason why this was added as explained in https://github.com/huggingface/transformers/pull/24565 - if you loaded a llama tokenizer from a GGUF file you can ignore this message. Loading checkpoint shards: 100%|██████████████████████████████████████████████████████████| 2/2 [00:10<00:00, 5.18s/it] You are a helpful language and vision assistant. You are able to understand the visual content that the user provides, and assist the user with a variety of tasks using natural language. <|User|>: <image_placeholder> 請說明一下這張圖片 <|Assistant|>: 這張圖片展示了一位身穿傳統(tǒng)服飾的女性,她正坐在戶外,雙手合十,閉著眼睛,似乎在進(jìn)行冥想或祈禱。背景是綠色的樹木和植物,陽光透過樹葉灑在她的身上,營造出一種寧靜、祥和的氛圍。她的服裝以淡雅的白色和粉色為主,帶有精致的花紋,整體風(fēng)格非常優(yōu)雅。 描述還是比較準(zhǔn)確的
五、測試圖片生成在Janus目錄,新建image_generation.py腳本,代碼如下: import os import torch import numpy as np from PIL import Image from transformers import AutoModelForCausalLM from janus.models import MultiModalityCausalLM, VLChatProcessor model_path = "../deepseek-ai/Janus-Pro-7B" vl_chat_processor: VLChatProcessor = VLChatProcessor.from_pretrained(model_path) tokenizer = vl_chat_processor.tokenizer vl_gpt: MultiModalityCausalLM = AutoModelForCausalLM.from_pretrained( model_path, trust_remote_code=True ) vl_gpt = vl_gpt.to(torch.bfloat16).cuda().eval() conversation = [ {"role": "<|User|>", "content": "超寫實8K渲染,一位具有東方古典美的中國女性,瓜子臉,西昌的眉毛如彎彎的月牙,雙眼明亮而深邃,猶如夜空中閃爍的星星。高挺的鼻梁,櫻桃小嘴微微上揚(yáng),透露出一絲誘人的微笑。她的頭發(fā)如黑色的瀑布般垂直落在減胖兩側(cè),微風(fēng)輕輕浮動發(fā)色。肌膚白皙如雪,在陽光下泛著微微的光澤。她身著乙烯白色的透薄如紗的連衣裙,裙擺在海風(fēng)中輕輕飄動。"}, {"role": "<|Assistant|>", "content": ""}, ] sft_format = vl_chat_processor.apply_sft_template_for_multi_turn_prompts( conversations=conversation, sft_format=vl_chat_processor.sft_format, system_prompt="" ) prompt = sft_format + vl_chat_processor.image_start_tag @torch.inference_mode() def generate( mmgpt: MultiModalityCausalLM, vl_chat_processor: VLChatProcessor, prompt: str, temperature: float = 1, parallel_size: int = 1, # 減小 parallel_size cfg_weight: float = 5, image_token_num_per_image: int = 576, img_size: int = 384, patch_size: int = 16, ): input_ids = vl_chat_processor.tokenizer.encode(prompt) input_ids = torch.LongTensor(input_ids) tokens = torch.zeros((parallel_size * 2, len(input_ids)), dtype=torch.int).cuda() for i in range(parallel_size * 2): tokens[i, :] = input_ids if i % 2 != 0: tokens[i, 1:-1] = vl_chat_processor.pad_id inputs_embeds = mmgpt.language_model.get_input_embeddings()(tokens) generated_tokens = torch.zeros((parallel_size, image_token_num_per_image), dtype=torch.int).cuda() for i in range(image_token_num_per_image): outputs = mmgpt.language_model.model(inputs_embeds=inputs_embeds, use_cache=True, past_key_values=outputs.past_key_values if i != 0 else None) hidden_states = outputs.last_hidden_state logits = mmgpt.gen_head(hidden_states[:, -1, :]) logit_cond = logits[0::2, :] logit_uncond = logits[1::2, :] logits = logit_uncond + cfg_weight * (logit_cond - logit_uncond) probs = torch.softmax(logits / temperature, dim=-1) next_token = torch.multinomial(probs, num_samples=1) generated_tokens[:, i] = next_token.squeeze(dim=-1) next_token = torch.cat([next_token.unsqueeze(dim=1), next_token.unsqueeze(dim=1)], dim=1).view(-1) img_embeds = mmgpt.prepare_gen_img_embeds(next_token) inputs_embeds = img_embeds.unsqueeze(dim=1) # 添加顯存清理 del logits, logit_cond, logit_uncond, probs torch.cuda.empty_cache() dec = mmgpt.gen_vision_model.decode_code(generated_tokens.to(dtype=torch.int), shape=[parallel_size, 8, img_size // patch_size, img_size // patch_size]) dec = dec.to(torch.float32).cpu().numpy().transpose(0, 2, 3, 1) dec = np.clip((dec + 1) / 2 * 255, 0, 255) visual_img = np.zeros((parallel_size, img_size, img_size, 3), dtype=np.uint8) visual_img[:, :, :] = dec os.makedirs('generated_samples', exist_ok=True) for i in range(parallel_size): save_path = os.path.join('generated_samples', f"img_{i}.jpg") img = Image.fromarray(visual_img[i]) img.save(save_path) generate( vl_gpt, vl_chat_processor, prompt, ) 注意:根據(jù)實際情況,修改model_path,conversation,parallel_size這3個參數(shù)即可。 提示詞是可以寫中文的,不一定非要是英文。 代碼在默認(rèn)的基礎(chǔ)上做了優(yōu)化,否則運行會導(dǎo)致英偉達(dá)5080顯卡直接卡死。
運行代碼,效果如下: # python image_generation.py Python version is above 3.10, patching the collections module. /root/anaconda3/envs/vll-Janus-Pro-7B/lib/python3.12/site-packages/transformers/models/auto/image_processing_auto.py:604: FutureWarning: The image_processor_class argument is deprecated and will be removed in v4.42. Please use `slow_image_processor_class`, or `fast_image_processor_class` instead warnings.warn( Using a slow image processor as `use_fast` is unset and a slow processor was saved with this model. `use_fast=True` will be the default behavior in v4.52, even if the model was saved with a slow processor. This will result in minor differences in outputs. You'll still be able to use a slow processor with `use_fast=False`. You are using the default legacy behaviour of the <class 'transformers.models.llama.tokenization_llama_fast.LlamaTokenizerFast'>. This is expected, and simply means that the `legacy` (previous) behavior will be used so nothing changes for you. If you want to use the new behaviour, set `legacy=False`. This should only be set if you understand what it means, and thoroughly read the reason why this was added as explained in https://github.com/huggingface/transformers/pull/24565 - if you loaded a llama tokenizer from a GGUF file you can ignore this message. Loading checkpoint shards: 100%|██████████████████████████████████████████████████████████| 1/1 [00:09<00:00, 4.58s/it]
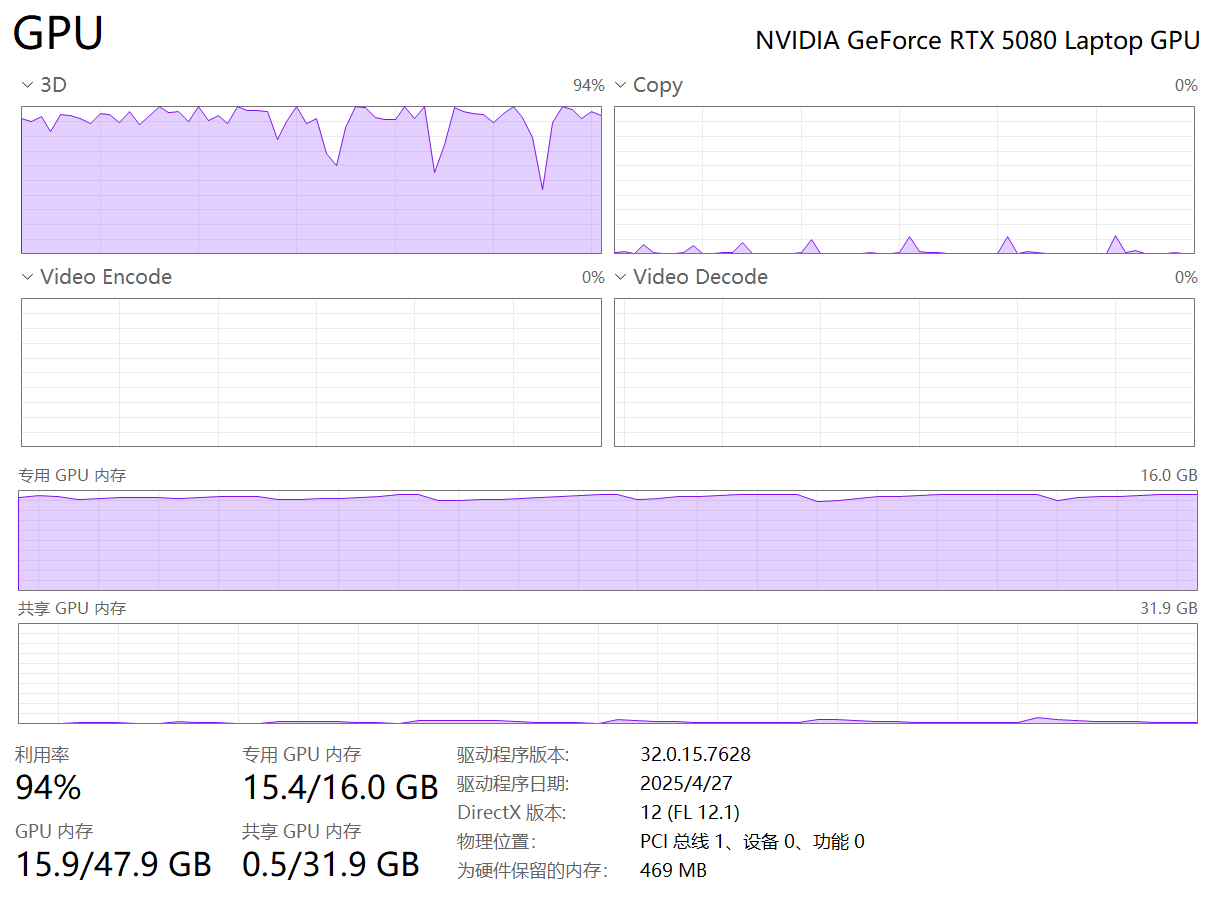
注意觀察一下GPU使用情況,這里會很高。
RTX 5080顯卡,16GB顯存,幾乎已經(jīng)占滿了。內(nèi)存,大概用了30G左右 不過不要擔(dān)心,大概持續(xù)30秒左右,GPU利用率會瞬間降到3%
等待30秒左右,就會生成一張圖片。 打開小企鵝
進(jìn)入目錄\home\xiao\vllm\Janus\generated_samples 這里會出現(xiàn)一張圖片
打開圖片,效果如下:
效果還算可以,距離真正的8k畫質(zhì),還是有點差距的。 注意提示詞,盡量豐富一點,生成的圖片,才符合要求。 如果不會寫提示詞,可以讓deepseek幫你寫一段提示詞。
六、答疑解惑為啥要本地部署?效果,大家也看到了,生成的圖片不太理想。但是圖片識別能力,還是挺好的。 普通用戶,一般只需要花錢買token就可以了,比如大家熟悉的,即夢,AI 繪蛙,Pic Copilot等等。 對于一個技術(shù)人員來說,人生啊,就是要折騰。 你折騰一番之后,有了成果,就會感到很滿足。 只能生成384x384的圖片嗎?我有嘗試過,將圖片分辨率擴(kuò)大到800x600,但是發(fā)現(xiàn)圖片看著不正常,明顯被拉伸。 官方給的demo,就只有384x384,為啥呢?我也不知道。可能是因為7b參數(shù)太少了吧,無法生成更高的分辨率。 一次只能生成一張圖片嗎?官方給的demo,一次能生成16張圖片。但是我的RTX 5080顯卡,完全扛不住。其實生成3張也可以,修改參數(shù) parallel_size: int = 3 但是運行代碼之后,時間會特別長,大概3分鐘左右。 運行完成之后,你會發(fā)現(xiàn)3張圖片,有概率會出現(xiàn)某張圖片,人物的臉型會出現(xiàn)扭曲,看著很怪異。可能7b對于生成人物不太擅長吧,或者因為7b參數(shù)太少了。 七、硬件購買建議國家補(bǔ)貼買電腦,國家最高補(bǔ)貼2000元。 這里要重點說明一下,為了拿這個補(bǔ)貼,我踩了不少坑。 持續(xù)時間買電腦的國家補(bǔ)貼政策 2024 年就有了,2025 年仍在延續(xù),按目前政策,補(bǔ)貼持續(xù)到 2025 年 12 月 31 日,但部分補(bǔ)貼資金緊張的地區(qū)可能會提前結(jié)束。 領(lǐng)取方式在拼多多,京東,淘寶,這些電商頁面,選擇有帶有國家補(bǔ)貼的電腦即可。 注意:并不是所有電腦都有補(bǔ)貼的,只有指定型號才有的。具體型號,以購買頁面為準(zhǔn)。 重點說明一下,一個身份證號,只能領(lǐng)取一次。 啥意思呢,比如你在拼多多領(lǐng)取了補(bǔ)貼,那么就不能在京東使用補(bǔ)貼。如果你想在京東使用補(bǔ)貼,就需要把拼多多的給退掉即可。 地區(qū)限制這個要重點說明一下,國家補(bǔ)貼是有地區(qū)限制的,并不是每個地區(qū)都有補(bǔ)貼的,基本上一線城市都有。 假如你領(lǐng)取了浙江的補(bǔ)貼,但是你的收貨地址是上海,這種情況是不能使用補(bǔ)貼的。 也就是說,你的收貨地址在哪里,那么你就領(lǐng)取對應(yīng)地方的補(bǔ)貼即可。 假如地區(qū)領(lǐng)取錯了,怎么辦? 也簡單,退掉即可。 假如你領(lǐng)取了浙江的補(bǔ)貼,但是你的收貨地址是上海。那么你就隨便寫一個浙江的收貨地址,然后在領(lǐng)取國家補(bǔ)貼頁面,把補(bǔ)貼退掉即可。 最后再次選擇上海地區(qū),領(lǐng)取補(bǔ)貼。 使用方式必須使用云閃付支付,微信,支付寶是不支持的。 領(lǐng)取了補(bǔ)貼之后,然后購買商品,選擇云閃付。 我基本上都是用支付寶,微信。云閃付都沒用過,也簡單。直接下載云閃付app,然后綁定銀行卡即可。 付款的時候,就可以看到商品價格少了2000塊錢。 注意:補(bǔ)貼使用了之后,資格就沒有了。因為一個身份證,只能用一次。 退貨情況假設(shè)你購買的電腦有質(zhì)量問題,發(fā)生了退貨情況。但是資格已經(jīng)用了,是否還可以用補(bǔ)貼。 答案是可以的,等待商家退款之后,必須要等到第2天,就可以再次領(lǐng)取補(bǔ)貼。 收貨情況使用國家補(bǔ)貼,快遞人員,需要對電腦進(jìn)行拍照。 需要拆除電腦包裝,拍照電腦背面的sn碼,就可以了。 電腦不需要開機(jī)演示
最后,有條件的,就盡快購買吧。因為2000塊補(bǔ)貼,可能到年底就沒了,或者提前結(jié)束,都有可能。 顯卡購買建議作為一個技術(shù)人員,看到很多博主在本地部署AI大模型,羨慕很。是不是心里癢癢,也想動手玩玩呢? 答案,肯定是想的。為了買游戲本,我本人可是籌備了4個多月,經(jīng)常看頭條各種文章,看看人家買的什么,哪些比較劃算。 對于顯卡,我覺得RTX 5080就足夠了,畢竟有16G顯存。當(dāng)然還有更高端的RTX 5090,顯存有32G,就單獨說這顯卡,售價在2.5w~3.2w之間。 RTX 5090太貴了,買不起。RTX 5080,售價在8299~11999,性價比還是可以的。 RTX 4060顯存8G,太低了,不值得購買。 RTX 4070顯存12G,這個可以考慮一下,我室友買的就是這個。 內(nèi)存購買建議內(nèi)存建議直接配置64GB,一般游戲本主板最大支持64GB。直接拉滿就對了,因為大模型運行確實比耗費內(nèi)存。 我本以為64GB就是極限了,但是昨天看到一個游戲本,主板最大支持192GB,提供4個插槽。太牛逼了,不服不行。 硬盤購買建議硬件直接買固態(tài)硬盤,不要買機(jī)械硬盤,太慢了。 對于容量,至少1TB,最好配2TB。我看很多玩3A游戲的博主,直接弄的2TB,索性我就加配置搞到2TB,因為主板有2個硬盤插槽。 現(xiàn)在1TB的固態(tài)硬盤也不貴,600多就搞定了。 2TB硬盤,一個給C盤,一個給D盤。目前D盤已經(jīng)使用了50%,大部分都放虛擬機(jī)了,確實比較耗費磁盤。
最后說一下,人性啊,是很奇怪的。叫你去買tokens,你就很摳。總想著免費,白玩。 叫你去買顯卡,1萬買了,倒是挺爽快的。 然后呢,你就可以24小時,叫顯卡去干活,生成圖片,玩3A游戲都行。 你也不用擔(dān)心,像前段時間deepseek一樣,經(jīng)常宕機(jī),服務(wù)器繁忙。 顯卡就是你的,你想怎么玩,就怎么玩。我的世界,我做主宰。 ?轉(zhuǎn)自https://www.cnblogs.com/xiao987334176/p/18864903 該文章在 2025/5/12 9:40:40 編輯過 |
關(guān)鍵字查詢
相關(guān)文章
正在查詢... 的專業(yè)生產(chǎn)管理軟件系統(tǒng),系統(tǒng)成熟度和易用性得到了國內(nèi)大量中小企業(yè)的青睞。")
主要針對港口碼頭集裝箱與散貨日常運作、調(diào)度、堆場、車隊、財務(wù)費用、相關(guān)報表等業(yè)務(wù)管理,結(jié)合碼頭的業(yè)務(wù)特點,圍繞調(diào)度、堆場作業(yè)而開發(fā)的。集技術(shù)的先進(jìn)性、管理的有效性于一體,是物流碼頭及其他港口類企業(yè)的高效ERP管理信息系統(tǒng)。")
提供了貨物產(chǎn)品管理,銷售管理,采購管理,倉儲管理,倉庫管理,保質(zhì)期管理,貨位管理,庫位管理,生產(chǎn)管理,WMS管理系統(tǒng),標(biāo)簽打印,條形碼,二維碼管理,批號管理軟件。")
都免費,不限功能、不限時間、不限用戶的免費OA協(xié)同辦公管理系統(tǒng)。")
|


 400 186 1886
")